Category: Recipes

  • Lemony Pea Mash Toast

    Its time to leave the avocado toast behind and take your toast experience to the next level with the little green protein machines – peas. Yes, peas. Fresh peas means the spring has arrived. And peas are so unassuming yet are humble powerhouses of nutrition. While this recipe is focused on the protein aspect, other nutrients include fiber and inflammatory phytonutrients .

    For those looking for a non-bean or non-soy plant based protein source, this recipe is a great option. The sweetness of the green peas compliments the citrusy lemon, earthy cumin and fresh parsley. Whats best is that it literally takes 10 minutes to prepare (if you are using frozen peas, that is).

    The best part about this recipe is that the mash can be prepared in advance. It can be as chunky or as smooth as you like. So for a quick on the go breakfast, all you need is a couple of slices of crisp toast, spread the mash on it, and top with your favorite toppings. It is that easy!


    Prep time5 minutes
    Cook time10 minutes
    Serves1

    Ingredients

    Legumes

    • Green Peas – 1.5 cups (Fresh of frozen)

    Vegetables

    • Onions – 1 small, finely chopped

    Spices & Herbs

    • Roasted Jeera Powder (Cumin) – 1 tsp
    • Black Pepper – 1 tsp
    • Garlic – 1 tsp, crushed
    • Parsley – 1 tbsp, chopped
    • Lemon Juice – 1 tbsp
    • Salt – As per taste

    Oils

    • Cooking Oil – 1 tbsp

    Method

    1. In a pan, add oil
    2. Once the oil heats up, add onions and garlic. Saute until the onions turn translucent
    3. Add the peas, salt and black pepper. Let the peas cook for 3-5 minutes until they become soft
    4. Add ground roasted cumin powder. Using a fork or the back of a wooden spatula, mash the peas. Mash the peas as per your desired consistency – chunky, or a complete mash. Cook for an additional 1-2 minutes. Add this point, you add a splash of water if the mixture is sticking to the pan
    5. Turn off the heat. Add chopped parsley and lemon juice
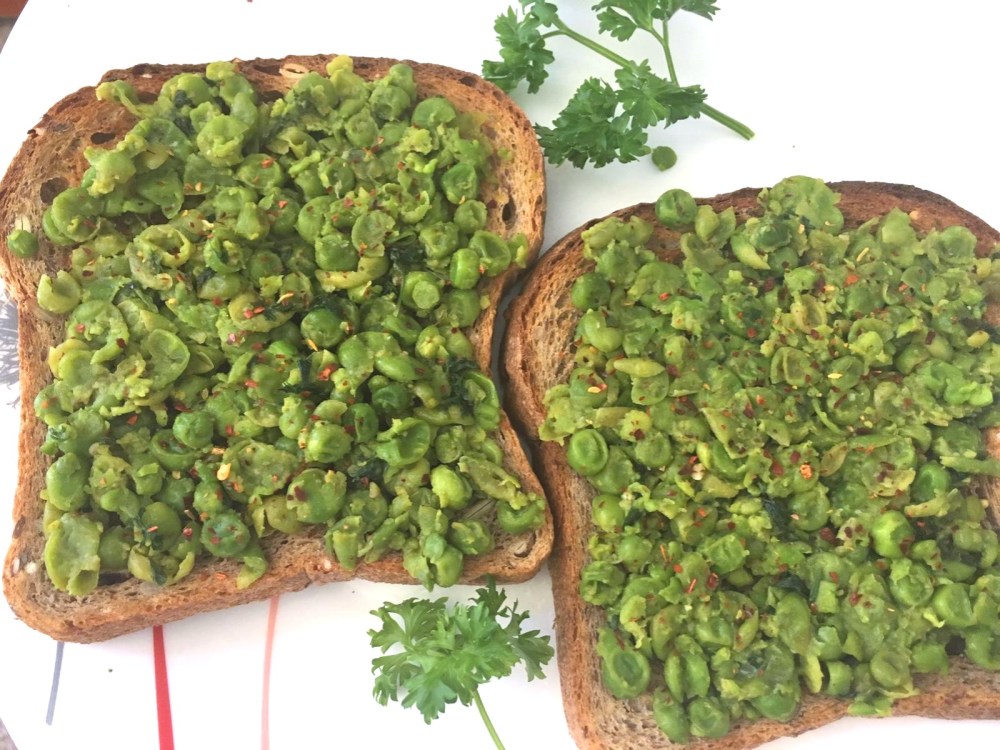
    6. Scoop a generous amount of the pea mash onto a crisp toast, spread and enjoy!

    Serving Suggestions

    • For a kick of spice, add a sprinkle of crushed red pepper flakes
    • Top with sesame seeds or slivered almonds for a crunch
    • Top with eggs the way you like them

    You can also follow me on Instagram to be up-to-date with what is cooking my kitchen. If you like this recipe, do rate it and share your comments below. Don’t forget to post your version on Instagram using #foodformyloveblog.

  • Masala Bhaat

    This dish holds a special place in my heart because it is from my childhood. It is a specialty of a close family friend who is Maharashtrian. She introduced me and my mum to her secret masala (spice mixture) that was used in this dish – Goda Masala. Whenever we met, she would prepare this dish and the house would simply smell magical. While I don’t get to eat her version anymore (because we live in different countries and we have not met in years), she does transport a whole load of the masala for me and mum.

    Goda masala is a unique masala from the Indian state of Maharashtra. It has a very distinguishable flavor and aroma. Its uniqueness comes from the use of very rare spices such as cassia buds and lichen. Every household is known to have their own variation and personal touch to the masala. While it has a very pungent aroma, it is not “hot”. The masala typically has standalone use in a dish due to its overpowering flavor. The version of masala that I use is from India and is not available here in the US (Maybe I will do a giveaway some day 🙂 ). In the meanwhile, other brands of this masala are readily available on Amazon or at an Indian grocery store.

    This dish makes for a perfect, one-pot weeknight meal and leftovers can be used for lunch boxes. Some basic spices, the secret masala, rice and a bag of frozen mixed vegetables are all you need. Go all out and use fresh vegetables if you have the time.


    Prep time10 minutes
    Cook time20 minutes
    Serves2

    Ingredients

    Vegetables

    • Mixed Vegetables – 2 cups, frozen (Or 2 cups worth of any combination of vegetables)
    • Baby Potatoes – 8-10, halved
    • Onion – 1 medium, finely chopped

    Spices & Herbs

    • Dhania Powder (Coriander) – 1/2 tbsp
    • Goda Masala – 2 tbsp
    • Tej Patta (Bay Leaf) – 1
    • Dalchini Powder (Cinnamon) – 1/2 tsp
    • Laung (Cloves) – 3-4
    • Elaichi (Cardamom) – 2 pods or 1/2 tsp of the powder
    • Green Chillies – 3-4, finely chopped
    • Ginger – 1/2 tbsp, crushed
    • Garlic – 1/2 tbsp crushed
    • Salt – As per taste
    • Fresh Dhania (Cilantro) – A few sprigs for garnish and spice paste

    Oils

    • Cooking Oil – 2 tbsp

    Grains

    • Rice – 1 1/2 cups (washed and soaked)

    Method

    1. In a blender, add cilantro, green chillis, ginger and garlic (with a splash of water) to make an aromatic green paste. Keep this aside for use later
    2. Turn on the Instant Pot to “sauté” mode. If using a pressure cooker, heat it up on medium heat
    3. Add 2 tbsp of oil. To this, add the bay leaves, cinnamon, cardamom and cloves. Fry for 30-45 seconds until the bay leaves start to sizzle
    4. Add onions and sauté until they are translucent
    5. All the baby potatoes, vegetables and sauté for 1-2 minutes
    6. Add the soaked rice and mix for 1 minute
    7. Add the blended green paste. Mix well for an additional 1-2 minutes
    8. Add coriander powder, goda masala and mix for 1-2 minutes
    9. Add the required water (approx. 3 cups of water of 1 ½ cups of rice), and then add salt as per taste
    10. Close the Instant Pot lid. Use the pressure cooker mode with a cook time of a 12-13 minutes. If using a pressure cooker, close the lid, place the pressure weight on the lid. Cook for 4-5 whistles
    11. Once the cooking is complete, manually release the pressure from the Instant Pot. If using a pressure cooker, wait for the cool down and then remove the pressure weight.
    12. Serve the masala bhaat on a plate. Garnish with lemon juice, fresh cilantro and dried coconut. Enjoy with a side of raita (spiced yogurt) or pickle

    Cooking Suggestions

    • This recipe can work just as well with other grains such as quinoa or cous cous (for those who want to avoid rice)

    You can also follow me on Instagram to be up-to-date with what is cooking my kitchen. If you like this recipe, do rate it and share your comments below. Don’t forget to post your version on Instagram using #foodformyloveblog.

  • Sweet Potato and Green Moong Sprouts Salad

    If it were up to me, there would be sweet potatoes in everything. And because it is up to me in my kitchen, I use sweet potatoes wherever I can, such as in this salad. A sweet potato and green moong (mung beans) sprouts salad is a perfect salad bowl with the protein from the sprouts and the complex carbohydrates from the sweet potatoes. The pomegranates add a beautiful freshness to the salad. It is a simple, refreshing and healthy salad.


    Prep time10 minutes
    Cook time15 minutes (This does not include sprouting time)
    Serves2

    Ingredients

    Legumes

    • Sprouted Green Moong (Mung Beans) – 2 cups

    Fruits

    • Pomegranates – 1 cup

    Vegetables

    • Sweet Potato – 2 medium, diced
    • Persian Cucumbers – 3, diced
    • Sweet Onions – 1 cup, finely chopped

    Spices & Herbs

    • Cilantro – Enough sprigs to have 1 cup
    • Black Pepper – 1 tsp
    • Salt – As per taste
    • Garlic – 1 tsp
    • Dhania (Coriander) Powder – 1 tsp

    Other

    • Olive Oil – 2 tbsp
    • Lemon Juice – 2 tbsp

    Method

    1. In a pan, add olive oil and garlic
    2. Once the rawness of the garlic is cooked, add the diced sweet potatoes and saute for 5 minutes. Add salt and saute for an additional 5 minutes
    3. Add black pepper, dhania powder and continue to saute for a a few more minutes until the sweet potatoes are cooked through and are soft (but not mushy)
    4. Begin assembling the salad. Add the sprouted mung beans, sweet potatoes, chopped sweet onions and diced cucumbers to a mixing bowl. Add lemon juice and mix well
    5. Garnish with pomegranates and cilantro
    6. Chill in the refrigerator for 20-30 minutes and enjoy the cold salad. Alternatively, the salad can also be enjoyed warm as soon as it is assembled

    Serving Suggestions

    • If a plain paapad or a tostada is available in your pantry, top this salad on them and serve as “masala paapad” or a “chaat tostada”
    • Make a lettuce wrap using the salad (make sure to warm it slightly) as a filling
    • Use the salad as a part of a filling in a Kathi roll for a great crunch and freshness

    Give this refreshing salad a try. If you like this recipe, do rate it and share your comments below. You can also follow me on Instagram to be up-to-date with what is cooking in my kitchen and to share your version of the recipe with #foodformyloveblog.

  • Leek and Green Beans Subzi

    Leeks are an interesting vegetable. They are white and green and look like scallions, but are not. They are like a gourmet onion. They don’t have the pungency of an onion, but have a delicate onion flavor, and a sweet one at that. They add a subtle flavor to recipes without overpowering other flavors.


    Here are some pointers about purchasing leeks:

    • Clean white bulbs without any spots or blemishes are the freshest leeks
    • Firm, dark green leafs that are not wilted are also an indication of the freshness of leeks

    Cleaning and preparation of leeks is also important to be aware of. Leeks are grown in trench like settings deep in the soil. Once they are ready, they are pulled out of the soil. So, how should you clean them?

    • Rinse the entire leek from top to bottom under running water
    • Once you cut it up, place the cut pieces in a container cold water. This will let the soil and other debris to loosen and settle to the bottom of the container
    • Using your hands, pick out the cut pieces from the container and place into a colander, and re-rinse under running water
    • Pat dry with paper towel

    Leeks cannot be eaten raw, because they will have a harsh flavor. Starting from white portion of the leeks, following the light green portion and up until the dark green leafy portion can be consumed. The dark green leafs are tough and are difficult to consume straight. They can be cooked for a long time to soften and used in fillings or in soups, or it can be simply be used to flavor homemade broths.

    Leeks can be prepared in many different ways. They can sliced vertically into juliennes or can be sliced into ringlets. Because of their mild onion flavor, leeks work great as an onion replacement and in many different vegetable combinations. They can be sauteed or pureed.


    This “green” subzi has leeks and green beans, but is ripe for customization with vegetables and seasonings. The subzi is a simple saute with my choice of simple seasonings and be served with hot, fresh rotis.


    Prep time15 minutes
    Cook time15 minutes
    Serves2

    Ingredients

    Vegetables

    • Leeks – 2, sliced into ringlets
    • Green Beans – Fresh or frozen, 1.5 cups

    Spices & Herbs

    • Fresh Ginger – 1 tbsp, chopped
    • Cumin Seeds (Jeera) – 1/2 tbsp
    • Salt – As per taste
    • Haldi (Turmeric Powder) – 1 tsp
    • Kashmiri Red Chilli Powder – 1.5 tsp (For a milder spice, use Paprika powder)
    • Dhania (Corainder Powder) – 1 tsp
    • Tandoori Masala (Optional) – 1/2 tsp
    • Kasuri Methi (Dried Fenugreek Leaves) – A handful to sprinkle

    Oils

    • Cooking Oil – 1-2 tbsp

    Method

    1. In a pan, add oil and and jeera. Let the jeera splutter
    2. Add the chopped ginger and saute for 30 seconds
    3. Add the green beans and saute until they have cooked all but a little
    4. Add salt, haldi, red chilli powder and coriander powder. Mix. Add a sprinkle of water to de-glaze the pan
    5. Add the leek ringlets, mix and cook (with lid covered) for 3-4 minutes. Make sure the ringlets are not a mush, but have become tender
    6. Add tandoori masala and kasuri methi. Mix well and cook (with the lid open) for an additional 1-2 minutes
    7. Take the pan off the heat. Serve the subzi with fresh, hot rotis

    You can also follow me on Instagram to be up-to-date with what is cooking my kitchen. If you like this recipe, do rate it and share your comments below. Don’t forget to post your version on Instagram using #foodformyloveblog.

  • Fig and Walnut Granola

    I am going to be honest with you. Snacks like cookies, trail mixes etc. are always scarce in my pantry. I prefer fruits and nuts as a healthy snacking option over ready-made snacks. Plus, I am not much of a snacker. But, of course, my husband is a snacker. The minute he is back home from work, he goes straight to the pantry hunting for snacks. I have been able to turn his attention to healthier snacking options like fruits, but this fig and nut granola hit it out of the park for him.

    Naturally sweetened with Figs, Dates and Honey, this granola also has the power packed goodness of Walnuts and Oats and has delicate flavors. So, no artificial ingredients, completely natural and if the honey is eliminated (which is possible if the sweetness of the Figs work), this is a vegan granola.

    I had originally made this granola to carry on our hiking trip. We even ended up using it as a topping for our breakfast at our cabins during our trip. It was such a hit, that he has put in a sweet request to make a huge batch of this granola for his snacking needs.

    This granola can be eaten on its own, with milk, with other nuts as a trail mix, topped on yoghurt, added to a smoothie bowl – the possibilities are endless. The most exciting for me is that my husband has at least turned to a healthier snacking option, so taste and health for him is a win-win for me.


    Prep time15 minutes
    Cook time35 minutes
    ServesMultiple

    Ingredients

    Grains

    • Rolled Oats

    Nuts & Seeds

    • Walnuts – 1/2 cup, chopped
    • Almonds – 1/2 cup slivered
    • Figs – 1/2 cup chopped
    • Dates – 1/2 cup chopped

    Spices & Flavors

    • Ground Cinnamon – 1 tsp
    • Ground Nutmeg – 1 tsp
    • Salt – A pinch
    • Freshly squeezed Orange Juice – 2 medium Oranges
    • Honey – 2 tbsp

    Ingredient notes

    • Turkish Figs work best here because they are moist enough to not dry out during the baking process
    • Mejdool Dates work best because they are sweeter and moist to not dry out during the baking process
    • If vegan, eliminate honey. Alternate sweeteners such as Date Syrup, Maple Syrup, Jaggery or Coconut Sugar can be used

    Method

    1. Preheat oven to 350F
    2. Prepare a baking tray lined with parchment paper
    3. In a mixing bowl, add the all the dry ingredients first beginning with Oats, chopped Figs, Dates, and Nuts. Mix well
    4. Add the Cinnamon, Nutmeg and a punch of salt. Mix well again
    5. Now add he wet ingredients beginning with Honey, then Orange juice and mix well. At this point, the mixture should come together in a fairly tight mixture, but still with loose Oat and Nut bits
    6. Pour the granola on the tray and spread into an even layer. To get chunky granola bits (this is how I like it), press down on the mixture so that mixture is crowded and tightly packed, but not so much that it does not bake evenly
    7. Bake for 20 minutes. At this point, take the tray out and using a spatula, gently stir. Put it back in the oven and bake for an additional 10-15 minutes
    8. Once the baking is complete, allow the granola to cool, undisturbed. It will crisp up as it cools
    9. Break the granola into pieces and enjoy as you please (These can be stored in an air-tight container for 1-2 weeks)

    You can also follow me on Instagram to be up-to-date with what is cooking my kitchen. If you like this recipe, do rate it and share your comments below. Don’t forget to post your version on Instagram using #foodformyloveblog.

  • Oats-Dates-Apple Smoothie

    As much as I try to be healthy, eating a healthy breakfast early in the morning is often a challenge. To add to that, those people who are looking for an easy, no work, no mess option (like my husband), they eat the same breakfast cereal every day, literally every day. Thank God for me (for him) that I try to put together simple recipes that he and many others like him can use to make a quick, on-the-go and healthy breakfast.

    This breakfast smoothie is a “breakfast of champions” as I like to call it. With the the goodness of apples, natural sweetness of dates, the protein and complex carbohydrates from the oats and calcium from milk, there is nothing like it.


    From start to finish, it takes a maximum of 10 minutes to prepare. It takes longer to eat a bowl of cereal!! So yes, make this smoothie, drink it while you get ready for work or pour it in a to-go bottle and drink it while you drive, take the train or bus or drink it at your work desk. It is that convenient.


    As always, smoothies, like many other recipes, are open to customization. One can use different flavors, fruits, nut butters, nuts, fruits etc. and it would be just as delicious. Only thing though, I would recommend this only for breakfast, not for a meal or a snack because it quite a heavy smoothie and will surely keep you satiated for hours until lunch. As they, have breakfast like a king, like with this one.


    Prep Time5 minutes
    Cook Time10 minutes (No cooking, only blend blend blend)
    Serves1

    Ingredients

    Grains

    • Rolled Oats – 1/2 cup

    Fruits, Nuts & Seeds

    • Apple – 1/2 of a medium Apple, chopped
    • Mejdool Dates – 4 pieces, pitted
    • Almonds – Slivered, 1 tbsp
    • Chia Seeds – 1 tbsp

    Spices

    • Ground Cinnamon – 1/2 tsp

    Dairy

    • Milk – 1/2 cup

    Ingredient notes

    • If vegan, any plant based milk will also work in this recipe
    • I have used a Green Apple because that is what I had in my fruit bowl. Any type of Red Apple will work fine too

    Method

    1. In a blender jar, add the chopped apples, dates, oats, cinnamon and milk
    2. Blend until smooth
    3. Add 1/4 cup water and blend again (Add extra milk or water as per desired consistency. I don’t like my smoothie to be thick, so I add the water to loosen it up. If you like a thick smoothie, you can skip this step and increase the quantity of milk)
    4. Pour in a glass or a bottle. Garnish with nuts, fruits and chia seeds (Alternatively, the nuts and chia seeds can be blended along with the rest of the ingredients if you don’t like anything chunky or crunchy in your smoothie)

    Give this breakfast smoothie a try. If you like this recipe, do rate it and share your comments below. You can also follow me on Instagram to be up-to-date with what is cooking in my kitchen and to share your version of the recipe with #foodformyloveblog.